
Home > Apple Music Tips > Play Apple Music on Tesla
Top 4 Ways to Play Apple Music on Tesla
As an Apple Music subscriber and a Tesla owner, you may find yourself wanting to seamlessly integrate your music library into your car's entertainment system. While Tesla's built-in music streaming service is comprehensive, you might prefer the personalized playlists and extensive music library offered by Apple Music. Fortunately, with the advancement of technology and the increasing demand for integration, there are now ways to play Apple Music on your Tesla, allowing you to enjoy your favorite tunes while on the road. Let's explore the various methods and considerations for bringing the world of Apple Music into your Tesla.
Method 1: Through Apple Music Apple on Tesla
In 2022, Tesla added support for Apple Music in their cars, allowing owners to directly access and stream their preferred music and playlists while driving. However, it's important to note that iTunes Match and some high-quality audio features are not available at the moment. Also, to use this new feature, owners need to have the 2022.44.25 Tesla Holiday Update. Next, let's learn specifically how to use the native Apple Music app on Tesla to play music.
Ensure that your Tesla is connected to the internet and has the latest software update installed to utilize the Apple Music integration. This is a critical step for accessing the Apple Music integration.
To update your Tesla software: go to the "Software" section in settings, then select "Software Update" if it's available.
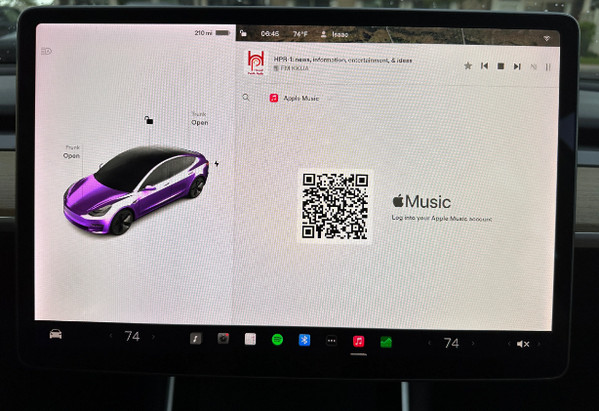
Step 1Select the "Media" option in Tesla's infotainment system, where you can manage audio and media sources, including Apple Music.
Step 2Click "Apple Music" in the "Media" menu, and a QR code will appear on the screen. Use the camera of your phone to scan the QR code displayed on your Tesla screen.
Step 3Follow the system prompts to log in to your Apple Music account using your Apple ID and password.
Step 4Once logged in, the Apple Music app will refresh on the touchscreen display. From there, you can browse through the extensive selection of songs, albums, and playlists offered by Apple Music directly on your Tesla.
Method 2: Through Bluetooth
Using Bluetooth is also a good option to play Apple Music on Tesla. Due to the current status of Apple Music integration on Tesla, we are unable to get Dolby Atmos support. But by using the Bluetooth connection, you can restore the original sound quality to the greatest extent. This approach also allows Tesla owners to enjoy their favorite tracks in the car without other restrictions.
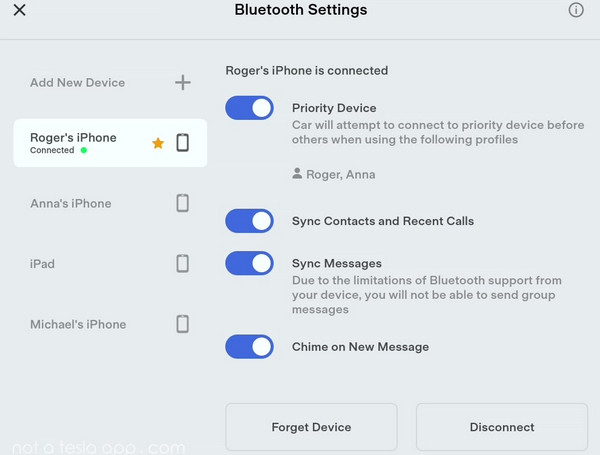
Step 1 Go to "Settings" on your phone, select "Bluetooth", and open the Bluetooth pairing mode.
Step 2Tap the Bluetooth icon on your Tesla’s touchscreen, and toggle the Bluetooth by tapping Add New Device > Start Search.
Step 3Connect to your phone Bluetooth in the list of the available devices.
Step 4Open the Apple Music app on your phone and play the song you like.
Method 3: Through Android Auto & Apple CarPlay
Tesla does not support Apple CarPlay and Android Auto by default, but a workaround by Michał Gapiński has shown that it's possible to enable these features on Tesla. To do this, you'll need to prepare third-party tools to integrate Apple CarPlay and Android Auto with cars that lack built-in support for these systems. To achieve this, You can leverage Carlinkit T2C technology to efficiently add Apple CarPlay to a Tesla.
When using this function to play Apple Music on a Tesla, ensure that your iOS device's system is iOS 13 or above.
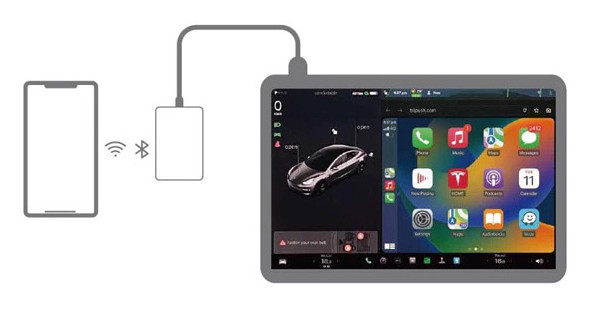
Step 1 Connect a CarPlay third-party device to your Tesla using a USB Type-C or USB-Type-A cable and the device will power on.
Step 2Open Settings on your iPhone and turn on Personal Hotspot.
Step 3Once done, go to Bluetooth from Settings and pair your iPhone with AutoKit. When prompted, click "Pair" to establish the connection.
Step 4Now turn on your car’s Wi-Fi and connect it to AutoKit immediately.
Step 5Continue into the car settings and make sure your Tesla's Bluetooth is connected to your phone.
Step 6Then, open the web browser on your car and type in Tespush.com. This will connect you to your phone and you can listen to the songs you want.
Method 4: Through USB Drive
You have the option to utilize a USB drive for playing Apple Music songs on your Tesla. To achieve this, you'll need to download Apple Music songs to your phone using a third-party tool, and then transfer them to USB Drive. NoteCable Apple Music Converter is a top tool for this purpose, enabling the download of Apple Music songs to local audio files in various output formats like MP3, AAC, ALAC, AIFF, WAV, and FLAC. This tool offers versatility and allows users to obtain Apple Music songs in their preferred file format.
Moreover, NoteCable functions not only as an efficient downloader but also as an audio converter. Following the download of Apple Music songs, you can promptly modify their output format using this tool. Additionally, it provides a 10x faster conversion speed, eliminating the need for extended waiting periods. One of the key advantages of NoteCable Apple Music Converter is its provision of lossless audio quality, ensuring that you can enjoy the downloaded Apple Music songs in the finest audio rendition.
NoteCable Atunes Music Converter
 If you need a solution for converting songs, albums or playlists from any streaming platforms (such as Spotify, Apple Music, Tidal, Amazon Music, Deezer, YouTube, YouTube Music, SoundCloud, DailyMotion, and more) to MP3 format, All-In-One Music Converter is the perfect choice.
How to Use NoteCable to Download Apple Music
Please follow the step-by-step tutorial below to learn how to save Apple Music songs to your computer in plain audio formats.
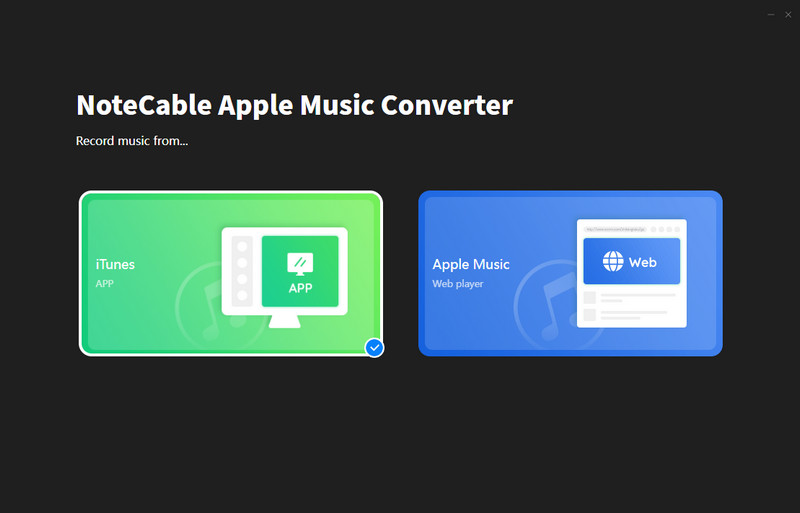
Step 1Install and Run the NoteCable Atunes Music Converter and Choose Conversion Mode
If you don't see the "Choose Conversion Mode" option in Step 1, simply move on to Step 2.
Launch the NoteCable Atunes Music Converter on your computer. And then you can choose App Mode or Webplayer Mode as your conversion mode.
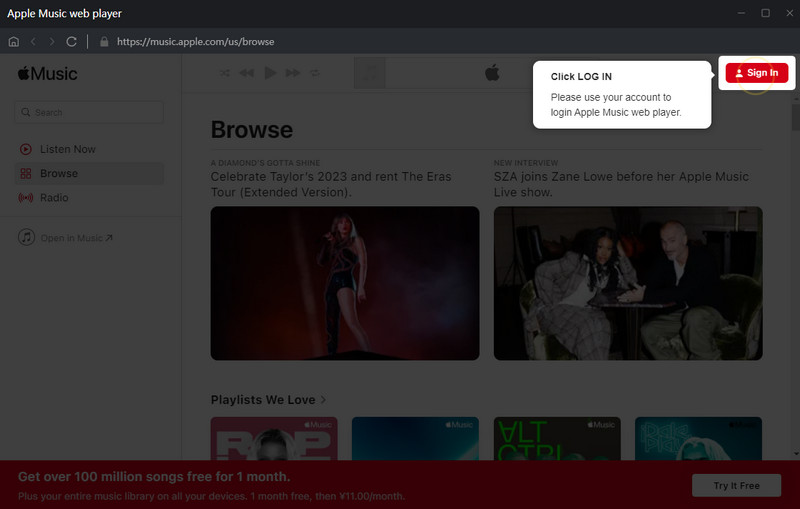
Step 2Sign into Your Apple Music Account
You ought to enter the necessary information to access your Apple Music content with Webplayer Mode.
Step 3Choose the Output Settings
Default settings will output all the Apple Music to the original AAC 320kbps. If you want to change it and suit your own needs, you can go to the Settings part on the left panel. You can set up the output format, output sound quality, output folder, and output file name to meet your personal needs.

If you are used to putting all downloaded songs in one folder, you can set up the option to None on the output organized column.
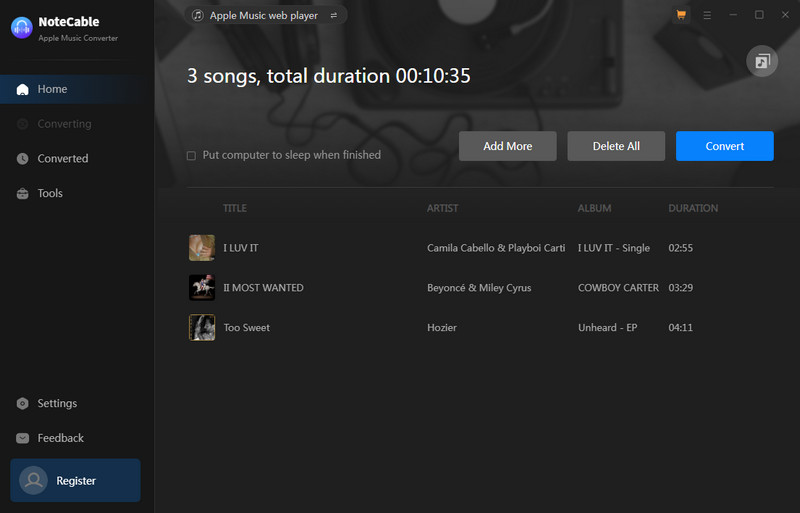
Step 4Add Apple Music Playlists to Convert
Now, pick a playlist of the songs that you want to get them to get downloaded. By clicking on the feature Click to add, NoteCable will read the current playlist and put it in the conversion panel. You then can select the songs to convert.
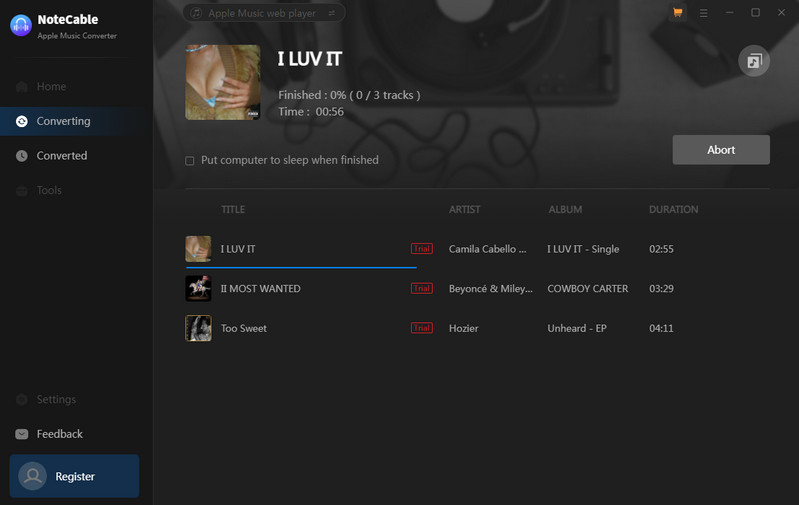
If you want multiple playlist conversions, you can put every playlist on the waiting list by clicking Add More button. All playlists will be converted when you press the Convert button to work out the task.
A brilliant 10X conversion speed will cut off the costs of the time spent waiting.
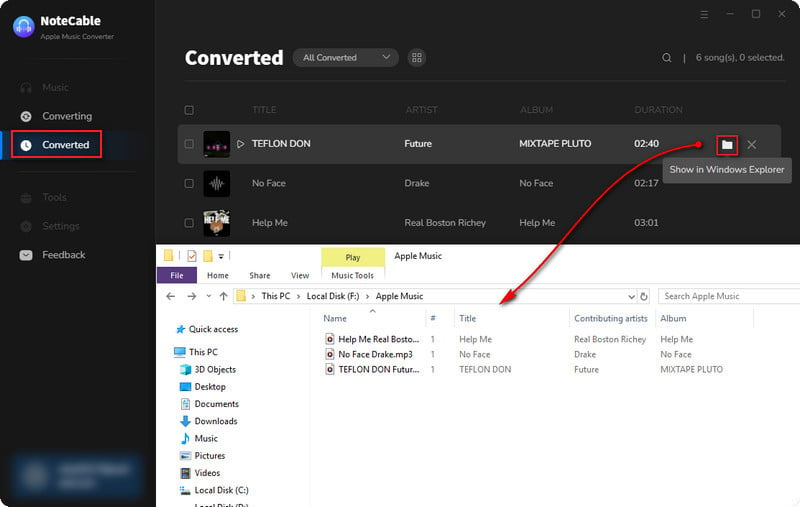
Step 5 Check Out Complete Apple Music
Finally, you can move to the Converted section on the left bar. And by tapping the Folder icon after the songs, you can reach out to the local place.
Once the conversion is done, you can play Apple Music on any device you like, without the restrictions from network and devices.
Transfer Downloaded Apple Music to USB Drive
Now that we have converted the Apple Music tracks to a local folder, you need to transfer them to your Tesla using a USB flash drive. Plug the USB drive into your computer and copy and paste the music files into the folder on the USB. Then connect this USB drive to the Tesla media player. The procedure is as follows.
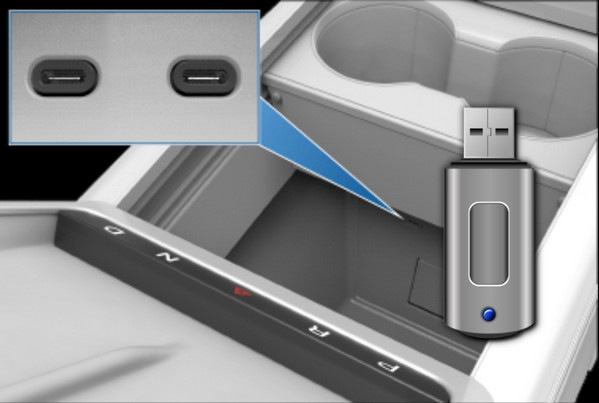
Step 1 Insert a USB flash drive into the front USB port of your Tesla.
Step 2 Tap Media Player > USB.
Step 3 Choose the folder of your converted songs under your USB.
Step 4 Tap a song and play. Now you can enjoy your converted music tracks on Tesla offline at will.
😫What Can I Do If Tesla Apple Music Not Working?
Many Apple Music Tesla users will encounter these problems: Apple Music cannot be loaded in Tesla, Tesla Apple Music black screen, Tesla Apple Music cannot be played, etc. The Apple Music Not Processing Tesla error may be related to an audio setup or connection error in your Tesla. For such playback problems, you can refer to the following solutions:
🎈Check Internet/Bluetooth Connection: An unstable WiFi or Bluetooth connection can disrupt the functioning of Apple Music on Tesla.
🎈Disable and Enable Apple Music as an Audio Source: Access the music icon at the bottom of your Tesla's screen, tap Settings, select Sources from the left panel, close the "Apple Music" option, and then reopen it.
🎈Restart Tesla Touch Screen: Press and hold both scroll wheels to restart the touch screen, which can resolve the Apple Music Tesla black screen issue.
🎈Log Out and Log Back Into Apple Music App: Logging out of the app and scanning the QR code to log back in can help eliminate unknown glitches and errors in the Apple Music app.
🎈Sign Out of Apple Music Account from Other Devices: If you do not subscribe to the Apple Music Family Plan that supports simultaneous use of Apple Music on 6 devices, signing out of your Apple Music account from other devices may be necessary.
🎈Wait for Tesla’s Next System Update: Some users have reported issues with playing Apple Music on Tesla after Tesla’s latest update. Waiting for the next update may resolve the issue.
If none of these fixes work or if you prefer not to wait for an update from Tesla, you can consider reaching out to Apple Music or Tesla Support for assistance. Alternatively, using NoteCable Apple Music Converter to download Apple Music songs to MP3, AAC, ALAC, AIFF, WAV, and FLAC, etc., and then listening to Apple Music offline on your Tesla via a USB memory stick is another viable option.
Summary
In conclusion, there are several effective methods to play Apple Music on your Tesla, ranging from utilizing Bluetooth and USB connections to leveraging third-party tools for downloading and converting Apple Music songs. By following these approaches, you can ensure seamless access to your favorite tunes while driving your Tesla, enhancing your overall music-listening experience. If you encounter any difficulties, reaching out to Apple Music or Tesla Support can provide further assistance in resolving any issues.
♦ You May Be Interested💗:
How to Play Apple Music on PS4?
If you looking for a solution to listening to Apple Music on PS4, please keep reading this article, and you will find the best way to play your favorite songs on PS4 offline. Learn More >>

Emma Wouters
Emma Wouters is a skilled writer who specializes in digital music streaming. She's an expert on music platforms and offers easy-to-understand advice on various tools.
