
Home > Apple Music Tips > Make Apple Music Louder
8 Ultimate Methods to Make Apple Music Louder on Android/iPhone/Windows/Mac
If you find that the volume of Apple Music is lower than you'd like, you're not alone. Many users have encountered this issue—"I keep adjusting the volume button, but it doesn't change". So, what exactly is causing this problem? Is it a device setting issue? A problem with the service itself, or perhaps a network connection issue?
Don't worry! We're here to provide you with solutions to help boost the volume of Apple Music, whether you're using it on Android, iPhone, Windows, or Mac. In the following sections, we’ll share 8 effective methods to make your Apple Music louder to ensure you enjoy every note of your music to the fullest!
- Method 1: Adjust the Volume Slider
- Method 2: Adjust Device Volume
- Method 3: Turn Off Sound Check
- Method 4: Use the Equalizer
- Method 5: Use High-Quality Audio Settings
- Method 6: Connect External Speakers
- Method 7: Disable Dolby Atmos
- Method 8: Close Heahphone Safety
- Bonus Tips👍: How to Download Apple Music to Computer as MP3 Files?
- Summary
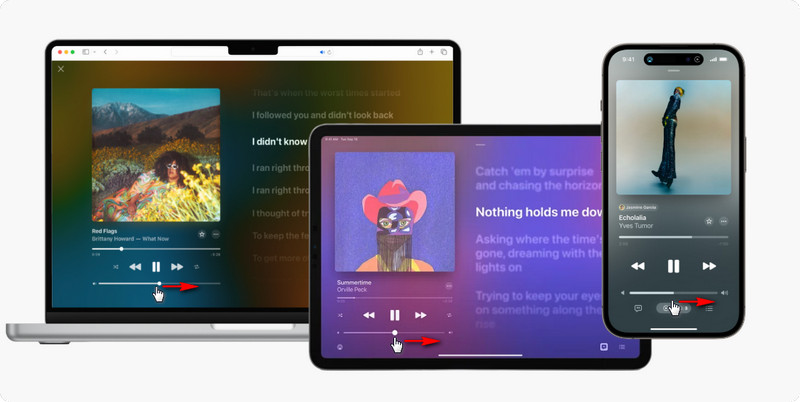
Method 1: Adjust the Volume Slider
Adjusting the volume slider is the most direct way to change the volume in Apple Music. Here’s how you can do it:
Step 1: Launch the Apple Music app on your device.
Step 2: Look near the bottom of the screen for the volume slider.
Step 3: Slide the volume control to the right to increase the volume to your desired level.
Method 2: Adjust Device Volume
 For Mobile (iOS and Android):
1. Press the Volume Up or Volume Down buttons on the side of your Android, iPhone or iPad.
2. Alternatively, swipe down from the top right corner (or up from the bottom on older devices) to access the Control Center and adjust the volume slider there.
 For macOS:
1. Click the volume icon in the menu bar at the top-right corner, and drag the slider to adjust the volume.
2. Press the F11 key (volume down) and F12 key (volume up) to adjust the volume.
 For Windows:
1. Click the speaker icon in the taskbar (bottom-right corner), and drag the volume slider to adjust the system volume.
2. Use the F1 (mute), F2 (volume down), and F3 (volume up) keys, if available on your keyboard.
Method 3: Turn off Sound Check
Sound Check automatically adjusts the playback volume of songs to ensure they play at a similar level. While this feature normalizes volume across tracks, it may cause some songs to sound quieter. If you wish to increase the overall volume of your Apple Music, consider disabling this feature.
For iOS Devices:
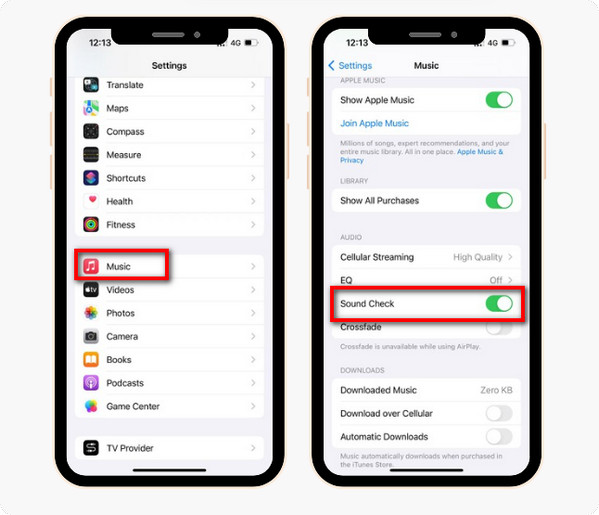
Step 1: Go to the Settings app on your device.
Step 2: Scroll down and look for Music.
Step 3: Toggle the Sound Check option to turn it off.
For macOS:
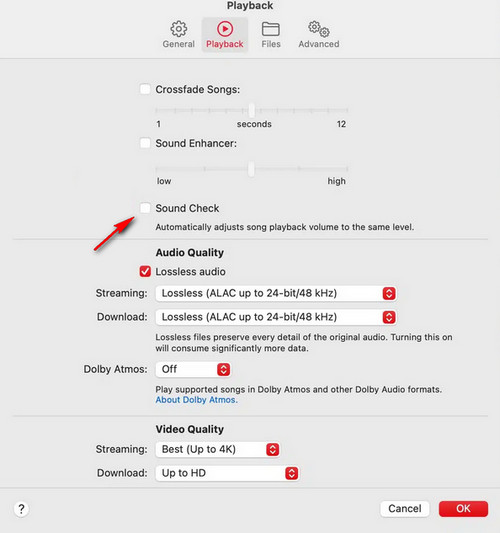
Step 1: Start by launching the Apple Music app on your Mac.
Step 2: Once the Apple Music app is open, look at the menu bar at the top of your screen. Click on Music. From the dropdown menu, select Preferences.
Step 3: In the Preferences window, you will see several tabs at the top. Click on the Playback tab to access the audio settings related to how your music is played.
Step 4: Within the Playback tab, locate the option labeled Sound Check. If this feature is currently enabled, there will be a checkmark in the box next to it. To turn it off, simply uncheck this box.
For iTunes (Windows):
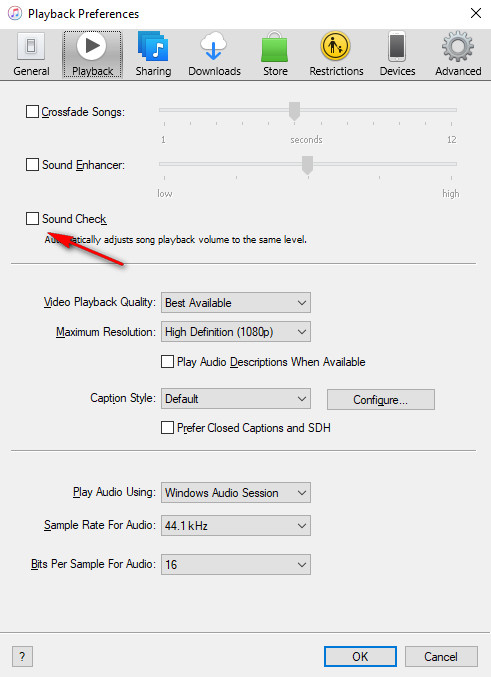
Step 1: Launch the iTunes application on your Windows computer.
Step 2: Click on Edit in the top-left corner, then select Preferences from the dropdown menu.
Step 3: In the Preferences window, click on the Playback tab.
Step 4: Uncheck the box next to Sound Check and click OK to save your changes.
Method 4: Use the Equalizer
The EQ (Equalizer) feature in Apple Music allows you to adjust the audio output to enhance your listening experience. It helps you tailor the sound to your preferences or the specific type of music you are listening to. It doesn't directly increase the overall volume, it can enhance certain frequencies, making your music sound louder and clearer. Here’s how to use EQ effectively:
For iOS Devices:
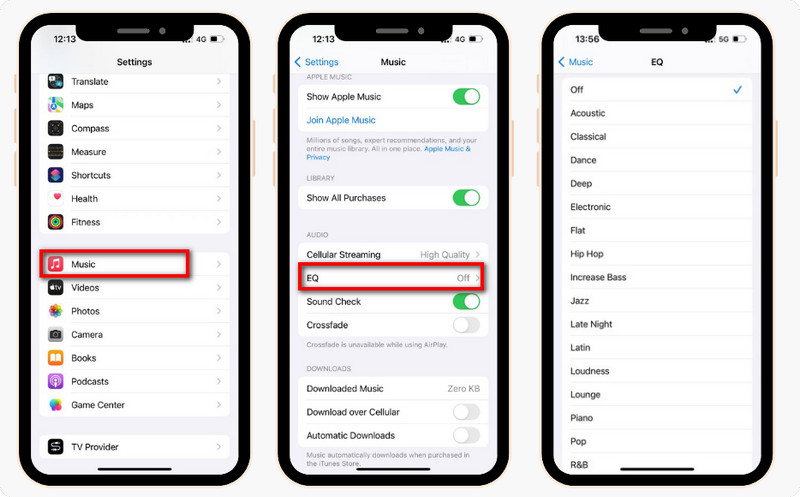
Step 1: Again, navigate to the Settings app.
Step 2: Tap on the "Music" option.
Step 3: Scroll down to find the "EQ" section.
Step 4: Select a preset like "Loudness" or "Hip-Hop", which can enhance the overall sound output.
For macOS:
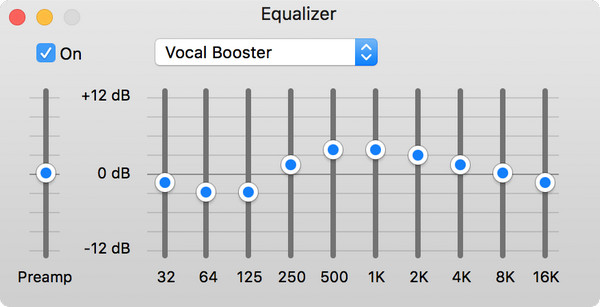
Step 1: Open the Apple Music app on your Mac.
Step 2: Click on Window in the menu bar and select Equalizer from the dropdown menu.
Step 3: Select a preset like Bass Booster or Loudness to enhance specific frequencies for a louder sound.
Step 4: Manually adjust the frequency sliders to boost mid and high frequencies, then play your music to hear the changes.
For iTunes (Windows):
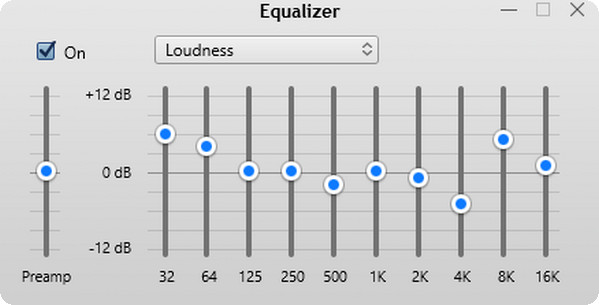
Step 1: Launch the iTunes application on your Windows computer.
Step 2: Click on View in the top-left corner, and select Show Equalizer.
Step 3: Choose a preset like Loudness or manually adjust the sliders to boost mid and high frequencies. Play a song to hear the changes.
Method 5: Use High-Quality Audio Settings
When you use high-quality streaming on Apple Music, you're essentially allowing the app to stream audio at a higher bitrate. A higher bitrate means more data is used to represent the sound, resulting in a richer, more accurate reproduction of the original recording. For example, Apple Lossless Audio can stream music at high-resolution quality up to 24-bit/192 kHz, capturing more detail than standard streaming formats. While high-quality audio doesn't make music louder on its own, it can make it feel louder. That's because clearer audio can make certain frequencies more pronounced, tricking your ears into thinking the music is louder. Let's see how to make it:
For iOS Devices:
Step 1: Launch the Settings app on your iPhone or iPad, then scroll down and tap on Music.
Step 2: Locate the Audio Quality section. Here, you can adjust settings for both Cellular Streaming and Wi-Fi Streaming.
Step 3: If you have an Apple Music subscription, you can enable Lossless Audio. Toggle this option to “On” and choose between Lossless (up to 24-bit/48 kHz) and Hi-Res Lossless (up to 24-bit/192 kHz) based on your preference and equipment.
Step 4: If you download music for offline listening, adjust the Download Quality to Lossless for the best sound when listening offline.
For macOS:
Step 1: Launch the Music app on your Mac.
Step 2: Click on Music in the menu bar at the top left, then select Preferences.
Step 3: In the Preferences window, navigate to the Playback tab. Here, you can enable Lossless Audio and select your preferred quality settings.
For iTunes (Windows):
Step 1: Launch iTunes on your Windows PC.
Step 2: Click on Edit in the menu bar, then select Preferences.
Step 3: In the Preferences window, go to the Playback tab. Here, you can adjust the Sample Rate (up to 192kHz) and Bit Rate (up to 24). 24-bit/192 kHz quality can reach the Apple Lossless Audio level.
Method 6: Connect External Speakers
If the settings feature fails to make Apple Music louder, one effective solution is to connect external speakers. Utilizing external speakers can dramatically enhance your listening experience by providing a more powerful and fuller sound compared to the built-in speakers of your device. Many external speakers are designed to deliver higher sound pressure levels, which means they can produce louder audio without distortion, allowing you to enjoy your music at a volume that suits your preferences.
For iOS Devices:
🟣Using Bluetooth Speakers
Step 1: Open the Settings app, tap on Bluetooth and toggle it on.
Step 2: Put your Bluetooth speaker in pairing mode (refer to the speaker's manual for instructions).
Step 3: In the Bluetooth settings on your device, look for the speaker'#4d4646s name under Other Devices, then tap on the speaker name to connect.
Step 4: Open the Music app and start playing your music. The sound should now come from the external Bluetooth speaker.
🟪Using Wired Speakers
Step 1: Use a 3.5mm audio cable to connect your iPhone/iPad's headphone jack (or Lightning to 3.5mm adapter if your device lacks a headphone jack) to the external speakers.
Step 2: Once connected, the audio should automatically route to the speakers. If not, swipe down from the top right corner (or up from the bottom on older devices) to access the Control Center, tap on the audio output icon, and select your speakers.
For macOS:
🟣Using Bluetooth Speakers
Step 1: Click on the Apple menu and select System Preferences. Click on Bluetooth and ensure it is turned on.
Step 2: Put your Bluetooth speaker in pairing mode. In the Bluetooth preferences, find the speaker's name and click Connect.
Step 3: Open the Music app and start playing. The audio will come from the Bluetooth speaker.
🟪Using Wired Speakers
Step 1: Plug one end of a 3.5mm audio cable into your Mac's headphone jack and the other end into the external speakers.
Step 2: To set up your external speakers, access the Apple menu, choose System Preferences, click on Sound, navigate to the Output tab, and select your external speakers from the available options.
For iTunes (Windows):
🟣Using Bluetooth Speakers
Step 1: Ensure Bluetooth is enabled on your Windows PC.
Step 2: Put your Bluetooth speaker in pairing mode.
Step 3: Open Settings > Devices > Bluetooth & other devices. Click on Add Bluetooth or other device and select your speaker to connect.
Step 4: Open iTunes and start playing your music. The audio will play through the connected Bluetooth speaker.
🟪Using Wired Speakers
Step 1: Plug one end of a 3.5mm audio cable into your Mac’s headphone jack and the other end into the external speakers.
Step 2: To set up your external speakers, access the Apple menu, choose System Preferences, click on Sound, navigate to the Output tab, and select your external speakers from the available options.
Method 7: Disable Dolby Atmos
Dolby Atmos is engineered to deliver a more immersive audio experience by utilizing a wider dynamic range. This design allows for a greater contrast between the quietest and loudest parts of a track. Consequently, certain sections may feel noticeably quieter, which can lead to an overall perception of reduced volume. If you find that the volume on Apple Music is insufficient while using Dolby Atmos, a practical solution is to disable Dolby Atmos.
Part 8: Close Heahphone Safety
If you're listening to Apple Music with headphones and find the volume unsatisfactory, it might be because the headphone safety feature is turned on. This feature is there to protect your hearing and overall health. You can turn it off to increase the volume on Apple Music. However, keep in mind that listening at high volumes for a long time can harm your hearing. So, if you feel any pressure or discomfort, it's a good idea to lower the volume or take a break.
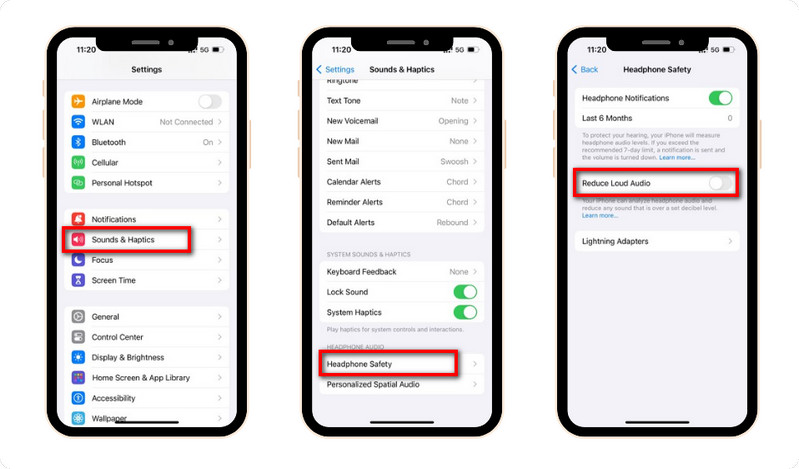
Step 1: Go to the Settings app on your iPhone or iPad, and scroll down and tap on Sounds & Haptics.
Step 2: Tap on Headphone Safety (or Headphone Notifications in some versions).
Step 3: Toggle off Headphone Safety or Reduce Loud Sounds if it’s enabled.
Bonus Tips👍: How to Download Apple Music to Computer as MP3 Files?
For Apple Music enthusiasts, the ability to enjoy music at a satisfying volume and sound quality, combined with the convenience of streaming anytime and anywhere, is highly desirable. For this purpose, the NoteCable Apple Music Converter is an excellent solution for those looking to enhance their listening experience. This powerful tool allows users to download Apple Music tracks directly to their computers while preserving the original audio quality to the greatest extent possible.
Once downloaded, the music files are stored in a variety of widely-used formats, including MP3, AAC, WAV, ALAC, AIFF, and FLAC. This flexibility ensures compatibility with virtually any device, whether it’s a smartphone, tablet, or dedicated music player. By utilizing the NoteCable Apple Music Converter, users can enjoy offline playback of their favorite tracks without the need for an internet connection, making it an ideal choice for travel, commutes, or any situation where connectivity may be limited.
NoteCable Apple Music Converter
 If you need a solution for converting songs, albums or playlists from any streaming platforms (such as Spotify, Apple Music, Tidal, Amazon Music, Deezer, YouTube, YouTube Music, SoundCloud, DailyMotion, and more) to MP3 format, All-In-One Music Converter is the perfect choice.
How to Download Apple Music to Your Computer with NoteCable?
Please follow the step-by-step tutorial below to learn how to save Apple Music songs to your computer in plain audio formats.
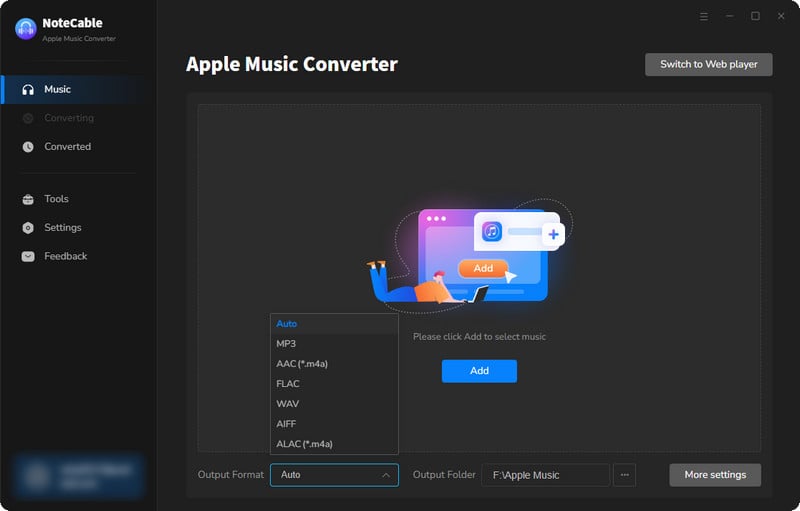
Step 2:Go to Settings, and set the parameter as your preference.

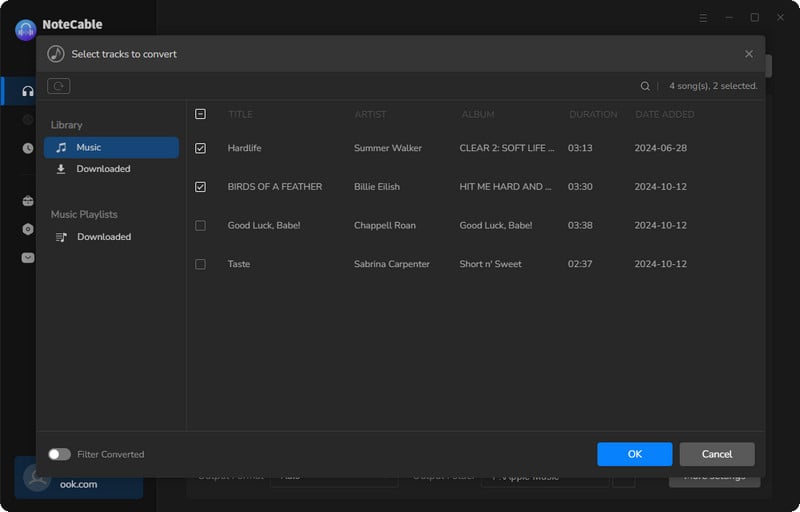
Step 3Simply click the blue Add button on the main interface to add songs from Apple Music to NoteCable.
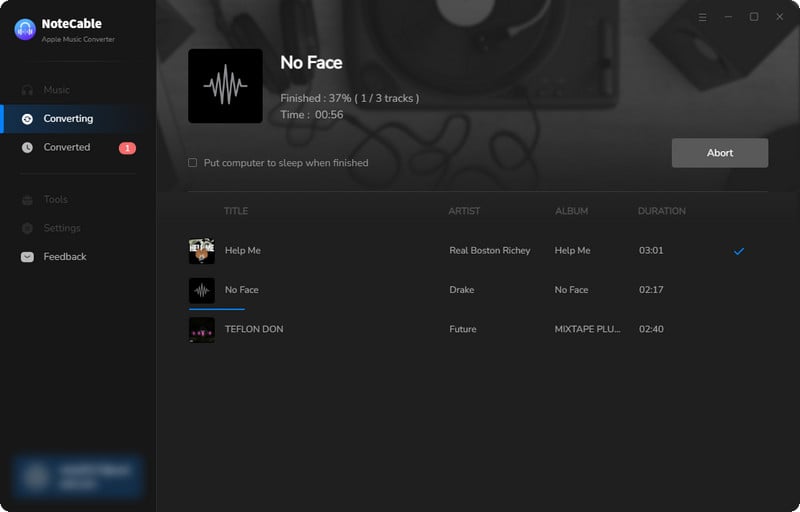
Step 4After completing the song selection, click the Convert button and the download will begin.
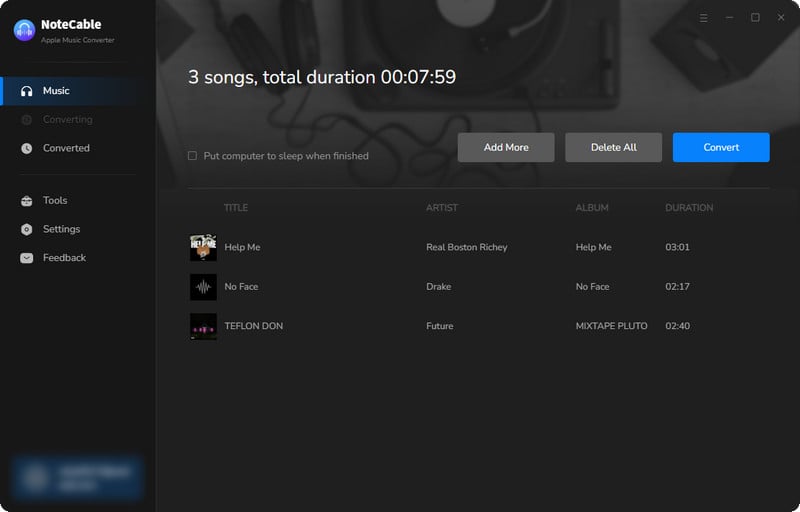
This process may take some time, please be patient.
Step 5Once all is done, you can view the downloaded songs in the "History". If you want to find the specific location, just hit the folder icon on the right side of the title.
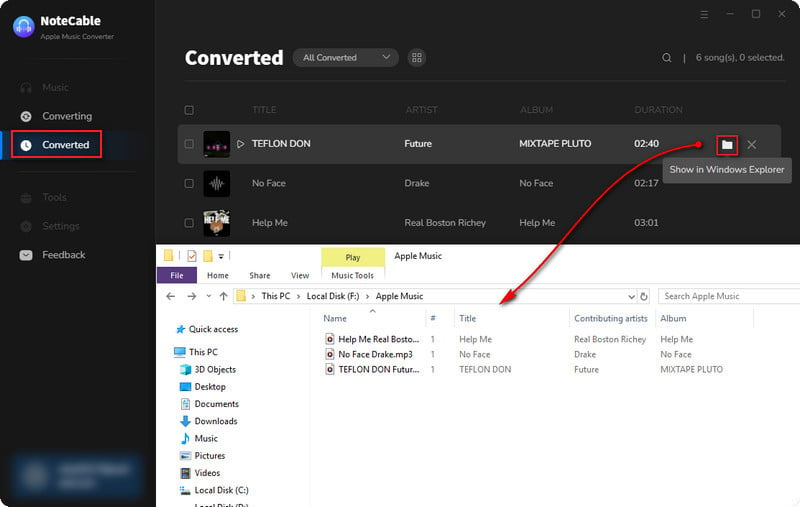
Now that the Apple Music files have been successfully saved to your computer, you can upload them to any device you like.
Summary
This article covers 8 practical ways to boost the volume of Apple Music on Android, iPhone, Windows, and Mac, ensuring there's a solution for everyone. It also shares an easy method to download Apple Music tracks for offline listening. This means you won’t have to rely on network stability or worry about device limitations, which really enhances your music experience. So, don’t hesitate—give it a try now!

Emma Wouters
Emma Wouters is a skilled writer who specializes in digital music streaming. She's an expert on music platforms and offers easy-to-understand advice on various tools.
